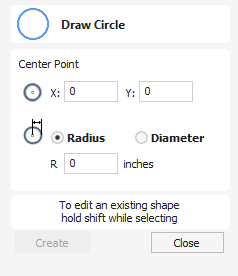
Draw Circle

Circles can be created interactively with the cursor and Quick Keys or by entering the exact coordinates and diameter / radius with typed input.
Watch this video to see this in action:
 Interactive
 Cursor
The default mode and the procedure for drawing circle is:
Click and drag the Left mouse to indicate the center point followed by releasing the button at the required radius / diameter (depends on what is set on the form).
Note
Holding Alt and dragging creates a circle from the middlepoint.
As the cursor is dragged across the screen the radius is dynamically updated. The increments will depend upon your snap radius and the job size.
 Quick Keys
The radius or diameter can be specified while dragging out a circle:
Type the value while dragging followed, by D if it's a diameter, or R if it's a radius:
Example:
1 2 R Gives a radius of 12
 Exact Size
Circles can also be drawn by entering the required XY origin, selecting either Radius or Diameter and entering the required size on the form.
Click Create to update the circle.
 Edit
Edit
Open the Draw Circle form and select the circle to modify.
The selected circle is displayed as a dotted magenta line. Edit the Center Point and Radius or Diameter
Click to update the circle
To modify another circle without closing the form hold a Shift key down and select the next circle.
 Close the form
To finish drawing with the tool, you can :
Click Close on the form
- Press the key Esc
- Click the Right mouse button in the 2D View